Maps and Mapping
Rationale Editor
In Rationale you work in the so-called editor. The editor is made up out of different parts that give access to all available functions and options:
- Workspace
- Main menu website
- Main menu editor
- Action toolbar
- Navigation toolbar
- Context toolbar
- Building Panel
- Text Panel
An overview:

Workspace
At the workspace you make maps by dragging boxes out of the Building Panel. You can add boxes too by double clicking with your mouse on any part of the workspace.
You can paste text directly in a box on the workspace by clicking on the box (your cursor is blinking in the box) and paste the text.
You can drag text out of the Scratchpad to the workspace and import images. You cannot drag and drop text directly to the workspace.
You can drag and drop text to the Scratchpad and drag and drop it from here to the workspace. A box including the text will be made automatically.
You can import and save maps by opening File -> Open in the left corner of the Ribbon at the Top.
Main menu website
The menu at the top contains all the main functions of the website, when you choose one of these the editor will be closed.
Main menu editor
The toolbar on the left is the main menu of the editor, here you find the options to open and save a map, search in a map, print a map, change settings of the editor, maximize screen size and the different links to our documentation center.
Action toolbar

On the action toolbar, which you can find on the left bottom, you will find the options for undoing, redoing, cut and paste.
Navigation toolbar

On the right bottom you find the navigation toolbar, using these options for switching between maps, moving maps and zooming.
Context toolbar

Building Panel
Choose the map or feature of your choice by clicking on it in the Building Panel.

Drag and drop boxes or templates from the building panel to the workspace. Add additional boxes until you see the purple insertion point. This indicates where it will be dropped. The box that it will attach to will have a blue outline. There is no need for connector lines, Rationale creates these automatically. You can drag and drop single boxes or whole branches to re-arrange the structure of maps.
For more information see the Quick Start.
Text Panel

Scratchpad:
You can drag and drop text to the Scratchpad and drag and drop it from here to the workspace. A box including the text will be made automatically. You cannot drag and drop text directly to the workspace.

Essay:
Select the Essays section in the Building Panel. Drag out a template and the Text Panel will automatically open. Follow the instructions to create a plan and watch your essay taking shape in the text panel.
When you have completed your map, select the Export button on the Text Panel screen and the essay will open as a word processing document. This will contain further guidelines to assist you complete a structured and well reasoned essay, letter, hypothesis or summary.
For more information and examples, see the Rationale Guide -> Essay Planning.

Outline:
With the Outline panel you can export the text of your map into another application (e.g. Word). When you open Outline, the text and logical indicators of any map you have clicked on will appear in the Outline pane. Choose the way you wish your text to appear by checking or clearing the boxes at the top of the pane. You can instantly preview the changes in the pane.
Next you can export the text of your map, and open it in your text editor.

My Maps
Click on the menu at the top of the Rationale homepage on the link [My Maps] to get access to all your saved maps an to maps that others have shared with you.

On the homepage of My Maps you have access to different functions and options:
- Make, move and remove folders and maps
- Status of Maps
- Printing Maps
- Exporting Maps
- Backup Maps
- Import Maps
You can organize you maps in two different ways:
You can use both together.
Organizing My Maps
On the page My Maps you see an overview of your maps and folders.
Here an image of the buttons at the top:

With the first button on the left you can change the ordering of your maps: click on recently modied or name.
Tags
The button [Tags] gives you access to the tags with which you labeled your individual maps.
When you click on 'Tags' you will see an overview of all your tags on one page. When you click o the little arrow next to 'Tags' you get access to all your tags grouped in batches of 10, when necessary.
Make, move and delete folders/maps
You can organize your maps in folders and subfolders.
At the top of 'My Maps' you see the folder [Shared with me]. This folder is always present. In this folder you can find all the maps that are shared with you by other users of Rationale.
Create a folder
Click the box with the plus sign to create a new folder.

Move folders and/or maps
First select the folder/maps you want to move and after that click on the button [Move to...]. A move to panel will be openend. Here you can choose the folder that should become the new main folder by clicking on the name.

Delete a folder or map
You can remove a folder or map by clicking the red trash-bin icon, a confirmation page will be shown before actual deleting the folder or map.
Backup Maps
Depending on the version of Rationale, there is the option of making a total backup as a zip-file.

Clicking on the button [Backup] will instantly download a zip-file with all your maps as .rtnl files to your computer.
Import Maps
You can import maps that are exported from RationaleOnline or that were made in Rationale Windows 2.x.

To import a map, go to My Maps and click on the button [Import map]. After selecting a local rtnl file, the file is added and available in your My Maps now.
Map Details
Click on an individual map in the homepage of My Maps to see the page with details of this map. The detail page of a map contains an image of the map and all kind of relevant information connected to this map.

Information
Right and bottom of the map image you see:
- the name of the map
- the maker and by who and when the map was last updated
- the attached Tags (when provided)
- share options, depending on the Status of the map
- revision history (only available in certain subscriptions)
- a summary (when provided)
- a description (when provided)
- comments (when provided)
- attachments (when provided and only available in certain subscriptions)
Edit
You can edit information by clicking on the edit icon when available.
At the bottom of the map image, you will find buttons to open, share, print, export and delete the map, when available.

At the right, under the image of the map, depending on the version of Rationale you have: Revision History. You can go back to earlier versions of the map. This is especially usefull when you are working together on a map.
You can see the date and time of changes made and the name of the editor. Click on the number to open the map of that particular date & time or editor.

Make or Import a Map
Make a map:
Start making a map by clicking on the green button [Create new map] in My Maps.
Import a map:
By using the [Import map] button you can import a map that is saved as a Rationale file (.rtnl). You can export and import your own maps as an .rtnl file and you can import .rtnl files that are made in Rationale Windows 2.
Adding Tags
You can add one or more tags to a map. These labels can help you with organizing maps.
Go to the Detail page of a map. Click in the box next to [Tags] , type your tag and press [Enter].

Clicking on a tag will give you all the maps with that tag.
See also Tags.
Status of a Map
Each map has a status. The status gives information on who has access to the map. The default status is Private.
In My Maps and in the Details page of a map you can see the status as an icon next to its name, it can be one of these states: private, unlisted, public, readonly or collaboration.
To change the status of a map, go to the details page of a map and click on the button [Make private]/[Make public] and choose an option.
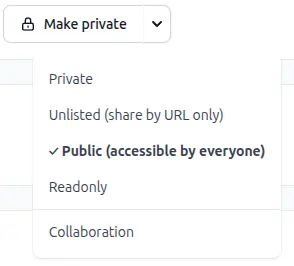
Private
Only you, the account owner, can see and access the map. This is the default status in Rationale.
Unlisted
The map can only be seen by people that possess a link to the map. They can open the map in tyheir own account by clicking on the link you sent them. They can save the map in their own My Maps.
Public
When a map has the status Public it can be seen by everyone by using the Public maps page.
Share
When you make a map Unlisted or Public you will see at the right on the Share panel of the Details page the different options the share the map with other people.

Readonly
The map can only be seen by people who know/have the link to the map, the map can't be changed.
Collaboration
The status Collaboration allows you to work together on a map. All the people you shared a map with can change the latest version of the map.
After choosing Collaboration, a new screen is opened. Here you can add people or groups of people that have the right to see and change the map.

Read/write or read-only
You can choose whether you want to give them Read/Write or Read-only rights. The difference between the status Readonly and Collaboration - Readonly is that in the last status only people who are invited can see the map.
Fill in the username or the email address of the user, give [Enter] and the map will be shared with the user. Adding email addresses will only work when the receiver of the map has ticked [Email is Public] in his/her My Profile.
The map will be visible now in his/her folder [Shared with me] in his/her My Maps. This folder is a so-called System Folder and is made automatically.
He/she will receive an email notification when Notifications are allowed in his/her My Profile.
You can see that the map is shared: the username of the user is visible.
Groups
You can make groups of users you want to share maps with by using [Add users by group..]. Fill in a name of the Group first and give [Enter].
Next, go to the group you just made and add user names or email addresses and give [Enter]. Important: The user names or email addresses should be comma or semicolon separated and without spaces, so: abcd@exampleone.com,efgh@exampletwo.com,..
Using email addresses will only work when 1) the receiver of the map has confirmed the email address in the process of making an account and 2) the user has ticked [Email is Public] in his/her My Profile.
Finally add the name of the Group in [Add users by group..] and give [Enter].
Afdrukken
Printing of a map can be done by using the Rationale editor. You will find the print option on the left toolbar, of by using the shortcut Ctrl+P.

- Print preview will show you how the map is printed on paper.
- The Portrait and Landscape options of the dropdown Orientation will let you change the view of the page.
- If you want to print only one specific map, select the map and choose for map in the selection dropdown.
Tips for printing large maps
Large maps can be difficult to read in A4 size. Here are some things you can do if you have a large map and do not have an A3 or A2 printer.
- Choose a landscape or portrait orientation to best suit your map.
- Select the Trim option. This will trim all your boxes in your map.
Tips for black & white printing
If you wish to print in black and white, we recommend you select to show ICONS and INDICATORS in the SHOW/HIDE section on the settings page. These will help distinguish reasons from objections in greyscale.
Exporting
You can export a complete map from the detail page, see: Export from the Detail page.
Export a map as text
How to export the text of your map into another application like Word?
- Open the Text panel on the right.
- Ensure the Outline tab is selected.
- Select the map you wish to export by clicking anywhere on it. The text of your map will appear in the Outline pane.
- Choose the way you wish your text to appear by using the settings button on the left bottom checking or clearing the boxes at the top of the pane. You can instantly preview the changes in the pane.
- Choose the export button on the bottom.
Note: Layout properties such as colour will only display in applications that support Rich Text Format. They will be lost if you use the .txt format.
Exporting from Detail page
Maps can be exported from the detail page of a map as different formats.
Click on [ Print/Export ]. All export formats are shown.
PDF: this is the most suitable for printing a map.
PNG: an image that can easily be used in other programs as a text editor or a presentation program. Using these options will open a new tab in your browser with the pdf/png. When you do not see a tab, please check whether your browser allows pop-up screens.
RTNL: this is an export format that can be imported later again into Rationale. Using this option will produce a file you can download.

System requirements
You can use Rationale from any computer connected to the internet.
We use very modern techniques to support making and editing maps in the browser. These techniques are only supported in the latest browsers. Rationale officially supports the latest version of Google Chrome, Mozilla Firefox, Microsoft Edge and Apple Safari.
Rationale on an Ipad only works with Safari.